How to Update Firmware on Linksys WiFi Extender?
Software updates on your Linksys WiFi extender are meant to improve its performance. Hence you should always keep an eye on the firmware updates and ensure to have the latest firmware version installed on the range extender. In this post, we will help you learn how to update firmware on Linksys WiFi extender in two ways: Manual and Automatic.
Linksys WiFi Extender Firmware Update Steps
Step 1: Verify the Connections
Your Linksys wireless extender should be well connected to the root router. Ensure this before you begin updating the extender. A shaky internet connection won’t let you update your device without getting stuck. Therefore, we suggest you make an Ethernet connection between the two devices to ensure a secure connection. In the absence of an Ethernet cable, you can proceed with a WiFi connection, however, make certain that the connection is well intact.
You should also make certain that both devices i.e. Linksys range extender and router are receiving adequate power supply.
Step 2: Log in to Linksys Extender
- Connect your computer to the extender’s network.
- Insert extender.linksys.com in the URL field to move ahead. The IP address 192.168.1.1 can also be used.
- On the login page, key in the extender admin password. Use the default password if not changed. The default password for your Linksys extender is password. In case you have changed the password, use the updated one.
- Click Login.
- You are logged in to your Linksys range extender.
Step 3: Update Firmware on Linksys Extender
The firmware update process on a Linksys WiFi extender can be carried out in two ways:
1. Manual Firmware Update
- Go to the official Linksys page and download the latest firmware file as per the extender model that you own.
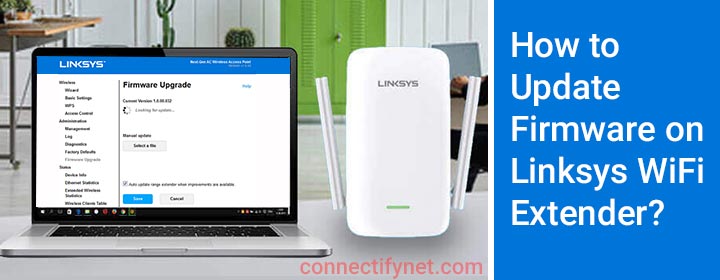
- On the Linksys admin portal, go to Administration > Firmware Upgrade.
- Under the Manual Update option, click on the Select a file button.
- Navigate and select the firmware file saved earlier.
- Click on the Start Upgrade button to initiate the firmware update process.
Stay on the same page till the update is completed. This will take some time. The extender reboots as soon as the firmware is installed on it. You can check the firmware version in the settings of the extender.
2. Automatic Firmware Update
- After logging in to your Linksys extender, go to Administration.
- Select Firmware Upgrade.
- If a new version of firmware is available, you will see it here.
- Click on Update Now button to begin the installation.
- You can select the checkbox “Auto update range extender when improvements are available” to further let the updates happen automatically.
- Let the update complete without interrupting it by any means.
- Click Save to make the changes effective.
Final Words
Updating firmware on a Linksys WiFi extender is very easy if you follow the steps given in this post vigilantly. We are anticipating that you have successfully upgraded your Linksys wireless extender. With this hope here we put a full stop to our informative piece of writing on how to update firmware on Linksys WiFi extender.


